
Smart objects have been out for a few years now and at first, I didn’t know why I should even use them. I felt my process was fine the way it was because I was used to it and incorporating new work processes would take some time and effort. When I started a new graphic design position a few years back I had no other choice than to deal with smart objects. The company I worked for used them excessively for their design process to keep everything streamlined. Since then, I use them in my own process and now I can’t imagine working in Photoshop without them. Let’s take a look at how they work and why you should start using them as well — sooner rather than later!
What are smart objects?
Smart objects are layers that retain the original data (and detail) and preserve that information. This means you can work in a non-destructive way.
Non-destructive editing means you can keep the quality intact when editing a layer.
‘Normal’ layers in Photoshop use pixel-based data. It’s where you lose quality when doing certain commands, like scaling or distorting. You end up losing the original information of your design and can’t restore it. That’s why you can scale down an image but can’t scale it back up without it looking bad.
You can use a non-destructive workflow for scaling, cropping, distorting, rotating, or warping a layer or using a filter. Because within the smart object, the original image stays untouched.
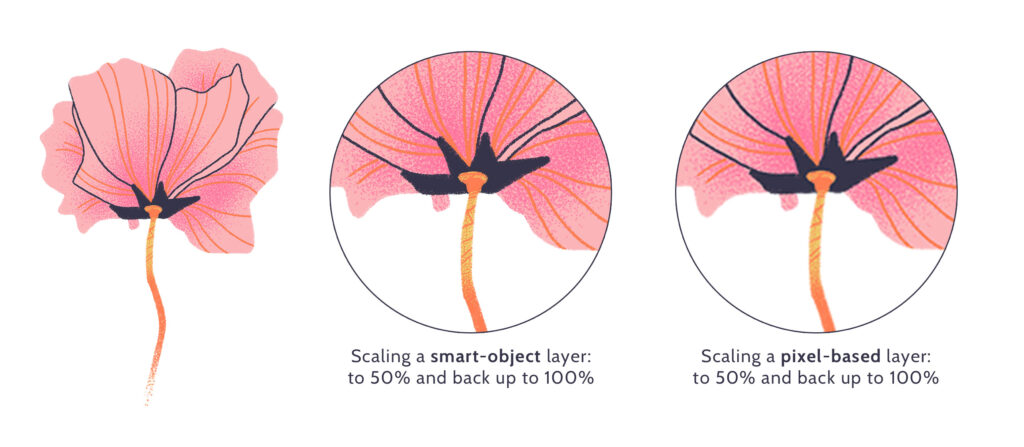
But because smart objects are not pixel-based anymore, you can’t directly manipulate them with certain actions such as painting on them or moving a selected area. If you want to do that, I would recommend using a new layer, creating a layer mask, or copying your selection onto a new layer.
If you want to edit your smart object’s content, double-click on the smart object icon on the layer itself. All adjustments will be made to every place the smart object gets used in the parent file when saving.
Related Article: Using Creative Cloud Libraries to Save Yourself Time
Different types of smart objects
There are two different kinds of smart objects — linked and embedded. Both have their ups and downs. You can also use both forms in the same parent file. Let’s take a look at how they work.
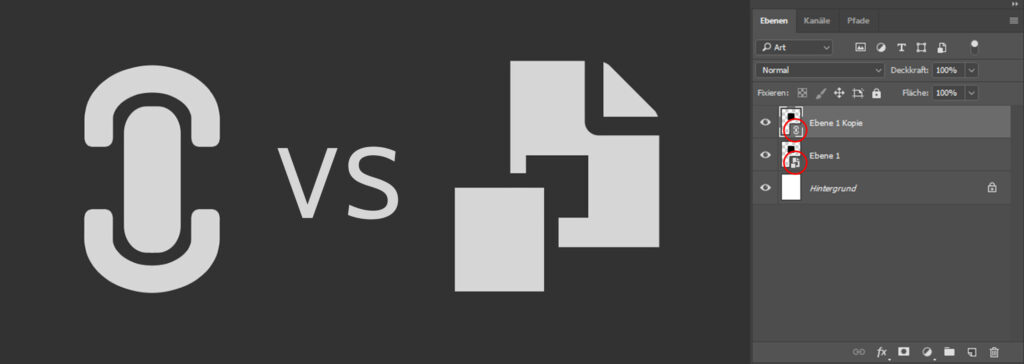
Embedded smart objects
Embedded smart objects have a ‘file over file’ icon in the bottom right corner of the image preview in your layers panel. As the name suggests, the smart objects are embedded, or stored/saved, within the parent Photoshop file. It is easier to organize, because you can access all layers and files from one spot. If you ever need to share a file with someone else, like an art director, you only need to send them your parent file and that’s it. They will have all the data they need.
But, depending on how many smart objects you use and how many layers they have, the file size can be extremely large. This can lead to problems sending the file and longer loading, opening, and saving times. This could slow down your process if you are someone who regularly saves their work (which you should!). If this happens to you, you might want to switch to the second smart object option — the linked smart object.
Linked smart objects
Linked smart objects have a chain icon on the image preview in your layers panel. These don’t store the original smart object information in the parent file. They only store a path to another file on your computer. This keeps the file size small and manageable and is therefore very helpful if you work with a lot of smart objects. This also helps with opening and saving times.
Because linked smart objects need to be saved to their own destination on your computer, you have to make sure not to lose them, or you won’t be able to use it in the parent file anymore. Also, if you move the files from one place on your computer to another, you have to re-link them again after opening up your parent file for the first time.
One of the best benefits is that you can use the same source file in different parent files. This is great if you want to incorporate a motif from your hero pattern in your complementary pattern. And if you decide to change the color of the motif while working on your collection, just go into your motif’s smart object, change the color there and save it. It will automatically be updated in the parent file of your hero and your complementary pattern.
How you can include smart objects in your design process
I love to set up my repeat files with smart objects from the beginning. It helps me be intentional with the placement and reduces the time I might spend on motifs I won’t be able to use because they don’t fit the layout.
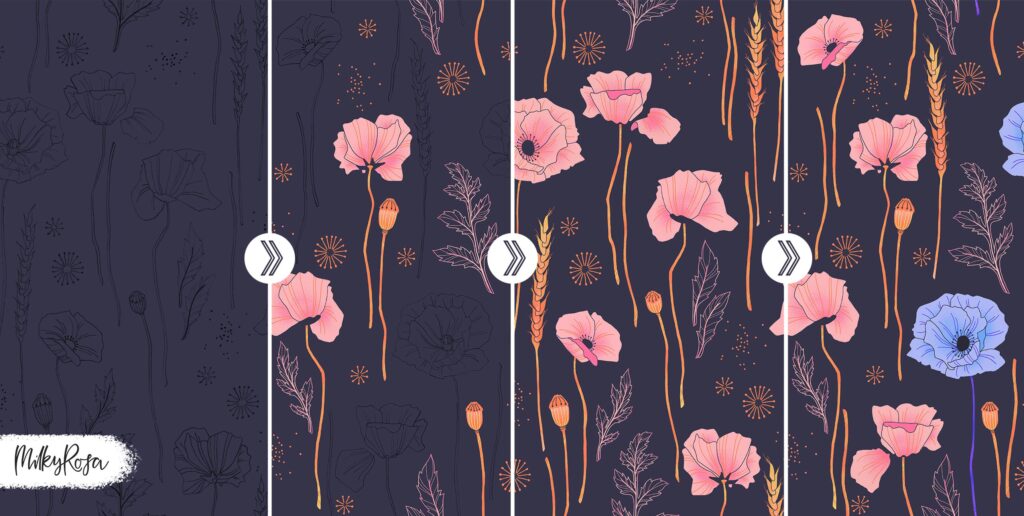
After sketching out my elements (either traditionally or digitally), I scale them up to a large size because remember, we can scale down, but can never scale back up without losing quality! I then turn each sketch motif into its own smart object.
Within each smart object, I start building the design and save it once I’m happy with it. I can see the changes instantly in my parent file. I’ll do this with all motifs until I am satisfied or go back in, if they need any tweaking. Because I only need to make changes to a motif once per smart object, this saves me a lot of time and it’s really easy to see if the choice I’ve made works for the pattern.
Helpful Photoshop Commands
- Place an existing file as a smart object: File > Place Embedded…/Linked…
- Turn a layer or group into a smart object: Right-click (on layer or group) > Convert to smart object
- Change the smart object type:
- Embedded: Right-click on layer > Convert to linked
- Linked: Right-click on layer > Embed linked
- Package the parent file: File > Package
- Update the missing layer sources: Right-click on the layer > Relink to file
Using smart objects in your Photoshop process might help you save time and be more efficient. It’s great if you want to incorporate the same motifs into different patterns and can simplify creating your repeats.
Written by Nina Schindlinger
Website: www.milkyrosa.com
Instagram: @milkyrosadesignagency
Nina, founder and creative director of MilkyRosa Design Agency, specializes in crafting branding and product designs for companies young-at-heart. Her unique style, known for its bold, playful, and charming elements, not only creates stand-out client projects but also breathes life into her own product line, adding a sense of fun and colour into the world.


